Home › Services
Wood privacy fences in Cincinnati: cedar, pine and board-on-board built to last
A solid wood privacy fence is still the most popular way to close in a backyard around Cincinnati. It blocks sight lines, gives dogs and kids a safe space, softens street noise a little and takes stain in any color you like. It also takes the full force of the wind and sits in wet clay soil through freeze-thaw winters, so how it is built matters more than how it looks on install day. This page covers what goes into a privacy fence in Cincinnati that holds up, from wood choice and style to posts, fasteners, finishing and upkeep.
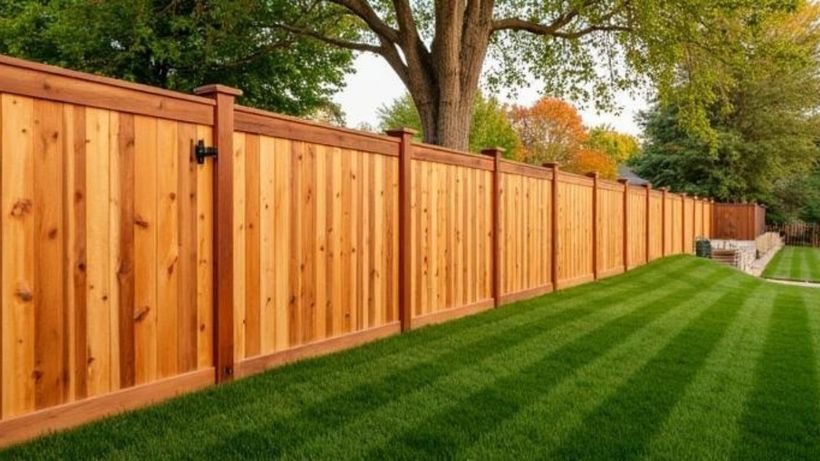
Pressure-treated pine vs cedar
Pressure-treated southern yellow pine is the default for posts and often for the whole fence. The treatment pushes preservatives deep into the wood so it resists rot and insects. Posts should be rated for ground contact, which is marked on the end tag, since boards rated only for above-ground use rot quickly when buried. Treated pine is strong and widely available, but it tends to shrink, check and twist as it dries, and it looks greenish or tan until it weathers or is stained.
Western red cedar is naturally resistant to decay thanks to oils in the heartwood, stays straighter as it dries, and weighs less. It smells pleasant, takes stain beautifully and weathers to a silvery gray if left alone. Cedar is softer and costs more, and its natural resistance is not strong enough for direct burial, so many cedar fences use treated pine or steel posts with cedar boards and rails. That hybrid is a common, sensible approach for a wood fence Cincinnati weather will test hard.
Choosing a privacy style
Several designs deliver privacy, and each has a different look, cost and wind behavior.
- Stockade: boards butted edge to edge, often with pointed or dog-ear tops. Simple and economical, but gaps open as boards shrink.
- Board-on-board: boards overlap in two layers, so shrinkage never opens a see-through gap. It is the most private option and looks finished from both sides.
- Shadowbox: boards alternate on each side of the rails with a small gap, so it looks the same from both yards and lets some air through while hiding most of the view.
- Horizontal: boards run sideways, usually with a tight gap, for a modern look. It needs closer post spacing or a center stiffener to keep long boards from sagging.
- Cap and trim: a top cap board and trim strip add shape and shed water off the board tops, which helps them last.
Posts, rails and spacing
Posts carry everything. Four-by-four posts are common for shorter fences, but many installers step up to four-by-six or six-by-six for six-foot privacy runs, gate posts and corners, since the larger section resists bending and twisting under wind load. Some builds use galvanized steel posts hidden behind wood trim, which avoids rot at the ground entirely. Post spacing is usually eight feet or less, and closer spacing makes sense for horizontal styles, exposed locations and heavy board-on-board designs.
A six-foot fence normally has three rails: top, middle and bottom. Two rails can leave boards free to warp in the middle. Rails can be set on the face of the posts, notched in, or fastened between them with brackets. Hole depth follows the same rules as any fence here: local frost depth is commonly cited around three feet, with the real number set by your building department, and taller solid fences deserve generous depth and a gravel bed for drainage.
Fasteners that do not rust or stain
Modern pressure-treated lumber contains copper-based preservatives that corrode plain steel quickly, and cedar contains tannins that react with bare steel to leave dark streaks. Use hot-dip galvanized or stainless steel nails and screws, and make sure hangers and brackets are rated for treated lumber. Stainless costs more but is the best choice for cedar and for stained fences where streaks would show.
Ring-shank nails and exterior screws hold much better than smooth nails, which tend to work loose as the wood swells and shrinks. Two fasteners per board per rail is standard, placed far enough from the ends to avoid splitting. Pre-drilling near board ends is worth the extra time on cedar.
Wind load, height limits and local rules
A solid privacy fence Cincinnati storms push on works like a wall against the wind. Every square foot of board catches the gust and transfers that force down into the posts. A six-foot solid fence on an open lot in Fairfield or Blue Ash can take a real beating in a summer thunderstorm, and the posts at the ends and corners take the most strain. Deeper holes, larger posts, closer spacing and designs with small gaps, like shadowbox, help reduce the stress. On a hillside, the windward side of the slope often gets the worst of it.
Heights for backyard privacy fences are commonly limited to around six feet in many municipalities, with lower limits in front yards and near corners where drivers need to see. Some places allow taller fences with approval. Each municipality in the four-county area writes its own version, and HOAs often add their own restrictions on style and color. Check with the zoning office and the HOA before settling on a height.
Good-neighbor finished side
Many local rules and HOA covenants require, and neighbor relations nearly always favor, putting the finished side of the fence facing outward toward the neighbors or the street. That means the posts and rails show on your side. Board-on-board and shadowbox styles avoid the question by looking good from both sides, which is one reason they are popular along shared lines.
It is worth talking to the neighbors before the fence goes up, even when the line is clear. Letting them know the timing, where the fence will sit and which side will face them heads off most disputes. Some neighbors will offer to split the work on a shared fence, which should be agreed on in writing.
Rot at the ground line and how to slow it
The ground line is where a wood fence dies. Soil holds moisture against the post, and the zone just above and below grade stays damp while getting enough air for fungus to thrive. Heavy clay makes it worse by holding water around the post long after rain stops.
- Use posts rated for ground contact and keep the cut ends treated with a brushed-on preservative.
- Put a few inches of gravel in the bottom of each hole so water drains away from the end grain.
- If using concrete, crown it above grade so water runs off rather than pooling against the wood.
- Keep the bottom of the boards an inch or two above the soil, with a replaceable rot board or gravel strip if you want the gap closed.
- Keep mulch, soil and leaf piles from building up against the fence over the years.
Staining, sealing and timing
Fresh pressure-treated lumber is often wet from the treatment process and will not absorb stain well at first. Many builders suggest waiting a few weeks to a few months, depending on weather, until a sprinkle of water soaks in rather than beading up. Kiln-dried lumber and cedar can often be finished sooner. Staining too early traps moisture and can peel, while waiting too long lets the sun gray and roughen the surface.
Semi-transparent oil or penetrating stains are a popular choice here because they soak in, block UV and water, and fade gradually rather than peeling. Solid stains hide more but may need more prep when recoating. In a humid climate with hot summers and snowy winters, plan on recoating every few years, sooner on the sunny south and west faces. Clean mildew and dirt first, let the wood dry, and apply in mild, dry weather.
Maintenance that keeps a privacy fence standing
A little attention once or twice a year catches problems while they are cheap to fix.
- Walk the fence each spring, pushing on posts to check for looseness and looking for lean after the winter freeze-thaw.
- Probe post bases with a screwdriver to catch soft wood early.
- Tighten or replace loose fasteners and swap out cracked boards before they let water into the rails.
- Trim vines, shrubs and tree limbs back from the fence so the wood can dry and limbs are less likely to fall on it.
- Wash off mildew and recoat stain on schedule to keep the wood from graying and checking.
- Check the gate for sag and adjust the anti-sag cable or hinges as the wood seasons.
Wood privacy fences in Cincinnati — common questions
Is cedar worth it over pressure-treated pine?
It depends on your priorities. Cedar resists decay naturally, stays straighter, weathers to an attractive gray and takes stain well, but it costs more and is softer. Treated pine is strong and economical but tends to twist and check as it dries. A common middle path is treated pine posts, set for ground contact, with cedar boards and rails, which gives the look of cedar with posts that hold up in the soil.
Which privacy fence style gives the most privacy?
Board-on-board gives the most complete privacy because the boards overlap. When the wood shrinks as it dries, no see-through gaps open up. Stockade fences, where boards butt edge to edge, often develop small gaps over time. Shadowbox styles hide most of the view and look the same from both sides, but they let a bit of light and air through, which some people like for reducing wind stress on the posts.
How tall can my privacy fence be?
Many municipalities around Cincinnati cap backyard fences around six feet, with lower limits in front yards and at corners where visibility for drivers matters. Some allow taller fences with a variance or special approval. The details vary between cities and townships, and HOAs often have their own rules. Check with your zoning office and HOA before finalizing a height so the fence does not have to be cut down later.
How long should I wait before staining a new wood fence?
For pressure-treated lumber, wait until the wood dries enough to absorb water, which can take a few weeks to a few months depending on weather. Sprinkle some water on the boards; if it soaks in, the wood is ready, and if it beads up, give it more time. Cedar and kiln-dried lumber can often be stained sooner. Waiting too long lets the sun gray and roughen the surface, which then needs cleaning first.
What kind of nails or screws should be used on a wood fence?
Use hot-dip galvanized or stainless steel fasteners. Treated lumber contains copper preservatives that corrode plain steel, and cedar tannins react with bare steel to cause dark streaks. Stainless is the best choice for cedar and for stained fences. Ring-shank nails or exterior-rated screws hold much better than smooth nails as the wood expands and contracts through the seasons, and brackets should be rated for use with treated wood.
Which side of the fence should face my neighbor?
The usual practice, and often a local or HOA requirement, is to face the finished side outward toward the neighbor or street, with posts and rails on your side. Board-on-board and shadowbox styles look finished from both sides, which avoids the issue on shared property lines. Check your local rules and covenants, and give neighbors a heads-up before construction begins to keep things friendly.
Why do wood fence posts rot at the bottom?
The zone just above and below the soil line stays damp and gets enough oxygen for decay fungi to thrive. Clay soil holds moisture against the post even longer, and a concrete collar that traps water can make it worse. Using ground-contact rated posts, gravel beneath the post, concrete crowned to shed water and keeping soil and mulch away from the base all help a post last longer.
Talk through your site
Start with the address, what you want done, and a few photographs of the area, including anywhere water sits after a heavy rain.
Related work
Fence Installation
New residential fences, laid out, set and finished for Cincinnati clay and hills.
Fence Repair
Leaning posts, sagging gates, storm damage and rotted boards, and when to replace instead.
Vinyl Fences
Low-maintenance vinyl privacy and picket fences and what cold winters ask of them.
Chain Link Fences
Galvanized and black-coated chain link for yards, dogs and property lines.
Aluminum & Ornamental Fences
Ornamental aluminum for front yards, slopes and pool enclosures.
Across the metro
West Chester
Newer subdivisions, HOA rules and flat-to-rolling lots in Butler County.
Mason
Suburban lots in Warren County, many with covenants on fence style and height.
Anderson Township
Wooded, hilly east-side lots where slopes and deer shape the fence.
Green Township & the West Side
Older west-side neighborhoods, steep yards and mature trees.